Monday, May 14, 2018
Slide of the month extra - Steampunk slide
Mid May 2018
Time to design: 2 hours
Time to build: 2 days
Original design: Bill Macfarlane
What if the petrol and electronic eras never happened? Would our society revolved around a steam technology? Steampunk stories revolve around the "alternate version of the historic past, especially 19th-century England, and involving advanced technologies usually based on steam power."
That's the premise of this slide.
Building this slide was really several ideas coming together has I was building it based on what I had available at the time. I had a old empty CO2 cartridge that I knew would be a part of the slide and I cut it in half. Next I wanted to have a copper boiler so I used a 3/4 inch FPT adapter and I cut it down to just above where it reduced. I sanded off the part you would normally use a wrench on so it would match the roundness of the area just above it. To have the CO2 cartridge fit inside it took a bit of sanding. Next I took a 1/4 brass tee and cut off one of the female ends. Next I cupped the rough edge of this piece of brass so it would fit the roundness of the outside of the cooper FPT adapter. I clamped the brass piece and inserted the CO2 cartridge then heated the assembly to solder them together. When it was cool, I threaded the top of the CO2 cartridge so it would accept the core of a tire valve stem which the center was removed. Next I wound a brass rod around pen to form the coil and soldered it to the copper base and inserted the top into the core. The ruby glass is lens from a car indicator light that fits perfectly inside the brass fitting.
Now to show the glow of the fire, I used a led from a flickering electronic tea light and inserted it into a hole drilled into the copper base. The led is connected to a battery holder and a push button switch.
Now I wanted all the electronics to fit inside the slide and to be able to screw a fitting into the bottom to seal it but that didn't work and the slide was already heavy enough. Rethinking it, I ground out the threads from the inside center so everything would fit inside. The base became a thin walled copper cap with a piece of rubber tube so the that friction fits inside the center. I had a brainstorm regarding hiding the switch and went back to the junk drawer to fine a brass elbow gas fitting. I drilled out the center of the elbow to the size of the switch and broke the bit in the process. To remove the drill I soaked the elbow in alum and water to dissolve the bit and a day later, with the bit gone, I soldered it to a hole in the cap. I mounted the switch inside the elbow so the button was just outside the fitting. In order to active the switch I added a cap to the end and when the cap is screwed deeply into the threads, it pushes the switch turning on the led.
Tuesday, May 1, 2018
Slide of the Month - Soyuz spacecraft
May 2018
Time to design: 2 hours
Time to print: 2 hours (your times may vary
Finishing: 2 hour
Original design: Thingiverse
Original designer:manboy
Try it yourself: Soyuz spacecraft
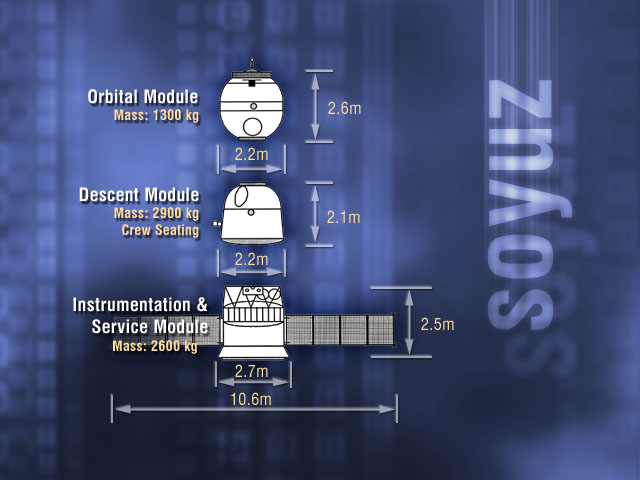
Designed for the Soviet Lunar Space program, the Soyuz spacecraft is still in use today bringing astronauts, cosmonauts, and other guests to the international space station. The Soyuz I printed would have been in flight during the time of the Gemini and Apollo US missions. You can read more about the Soviet manned lunar_program here.The space craft is made up of three part as shown in the diagram below.

By NASA - http://www.nasa.gov/mission_pages/station/structure/elements/soyuz/launch.html http://www.nasa.gov/images/content/112684main_soyuzparts_lg.jpg, Public Domain, Link
Printing this was pretty straight forward but I did and supports for the solar panels and the area around docking mechanism needed a bit of filling with UV glue. As to painting, it seems like there may have been two colors of green paint used on the Soyuz. I went with the darker of two and used a plastic spray paint. For the rest of the painted details, I used paint markers and the markings are done with water slide decal. One thing of note, I did print to a white decal as the clear decal did not show up well with the dark paint.
Subscribe to:
Comments (Atom)


